Working with Docker Images
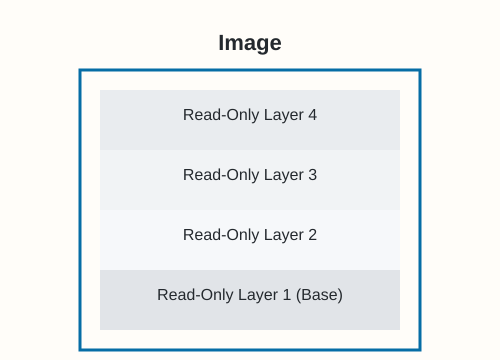
A Docker image is a read-only template used to create containers. It packages everything an application needs to run: code, dependencies, system libraries, and configuration metadata. Think of an image as a stopped container or a blueprint. You can start multiple running containers from the same single image.
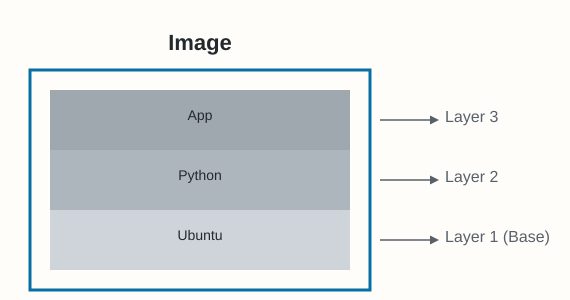
Docker images are constructed from a series of layers. Each layer represents a set of filesystem changes. Docker stacks these layers and presents them as a single, unified filesystem to the container. This layering system makes images efficient to build, store, and distribute.
Image Basics: Build-time vs. Run-time
Images are essentially build-time constructs, while containers are run-time constructs. You build an image, and then you run one or more containers based on that image using commands like docker run.
Once a container is running from an image, you typically cannot delete that image until all containers using it are stopped and removed.
Keeping Images Lean
Containers are designed for specific tasks, often running a single application or microservice. Therefore, images should ideally only contain the necessary code and run-time dependencies. Avoid including build tools, extensive debugging utilities, or other non-essentials in your final image.
This leads to the concept of slim images. For example, the official Alpine Linux image is very small (~5-7MB) because it includes only essential components. Many modern images ship without shells or package managers if the application doesn't require them at runtime, reducing size and attack surface. Images don't contain a full OS kernel; they use the kernel of the host machine they run on.
Images vs. Containers Quick Comparison
| Feature | Image | Container |
|---|---|---|
| Type | Blueprint (Read-only Layers) | Running Instance (Writable Layer) |
| Analogy | A recipe or class definition | A cake baked or object created |
| State | Static, immutable | Dynamic, has runtime state |
| Lifecycle | Persists until explicitly deleted | Typically ephemeral unless persisted |
Pulling Images from Registries
The most common way to get images is by pulling them from an image registry. A registry stores image repositories, and repositories contain different versions (tags) of an image.
Docker Hub is the default public registry. Other popular options include AWS ECR, Azure ACR, Google GCR, and private registries.
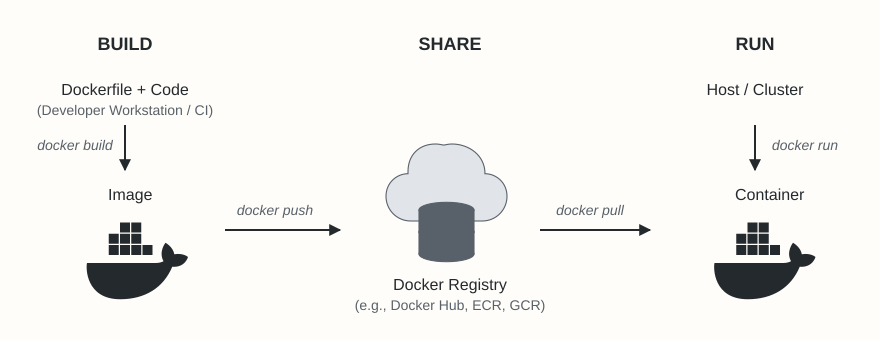
To pull an image, use the docker pull command. By default, Docker assumes you want the latest tag from Docker Hub.
# Pull the latest Ubuntu image from Docker Hub
$ docker pull ubuntu

# Verify the image is now local
$ docker images

shell@ REPOSITORY          TAG       IMAGE ID       CREATED         SIZE
shell@ ubuntu              latest    a04dc4851cbc   2 months ago    78.1MB

# docker image ls is an alias for docker images
$ docker image ls
shell@ REPOSITORY          TAG       IMAGE ID       CREATED         SIZE
shell@ ubuntu              latest    a04dc4851cbc   2 months ago    78.1MB
Image Naming and Tagging Explained
A fully qualified image name specifies the registry, user/organization, repository, and tag:
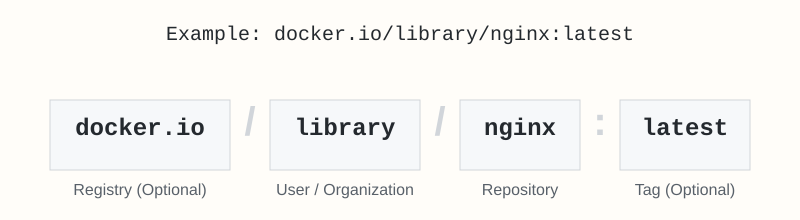
If parts are omitted, Docker uses defaults:
- No
registry-hostdefaults to docker.io (Docker Hub). - No
tagdefaults to latest.
Examples:
# Pull specific tags from Docker Hub official repositories
$ docker pull alpine:latest
$ docker pull alpine:3.18
$ docker pull python:3.11
$ docker pull python:3.11-slim # Example of a slim variant

# Pull from AWS ECR (replace placeholders)
$ docker pull <aws_account_id>.dkr.ecr.<region>.amazonaws.com/<repository-name>:<tag>

# Pull from Azure ACR (replace placeholders)
$ docker pull <registry-name>.azurecr.io/<repository-name>:<tag>

# Pull from Google GCR (replace placeholders)
$ docker pull <location>-docker.pkg.dev/<project-id>/<repository-name>/<image-name>:<tag>
Note: The
latesttag is just a convention. It doesn't guarantee it's the most recent version pushed; always check the repository documentation or use specific version tags for production.
Understanding Image Layers
Images are built layer by layer. Each instruction in a Dockerfile that modifies the filesystem (e.g., COPY, RUN, ADD) typically creates a new layer. Layers are cached, making builds faster if unchanged.
Inspecting Image Layers
You can observe layers during a pull and inspect them afterward:
-
During docker pull:
$ docker pull redis:latest
shell@ latest: Pulling from library/redis
shell@ 6e909acdb790: Pull complete
shell@ d9b98f603d6b: Pull complete
shell@ 513666b05c81: Pull complete
shell@ 764e7fbfdb05: Pull complete
shell@ 2884ccae34c1: Pull complete
shell@ df4660a56a60: Pull complete
shell@ 4f4fb700ef54: Pull complete
shell@ b138a3179b82: Pull complete
shell@ Digest: sha256:bd41d55aae1ecff61b2fafd0d66761223fe94a60373eb6bb781cfbb570a84079
shell@ Status: Downloaded newer image for redis:latest
shell@ docker.io/library/redis:latest
The lines ending in Pull complete show individual layers being downloaded.
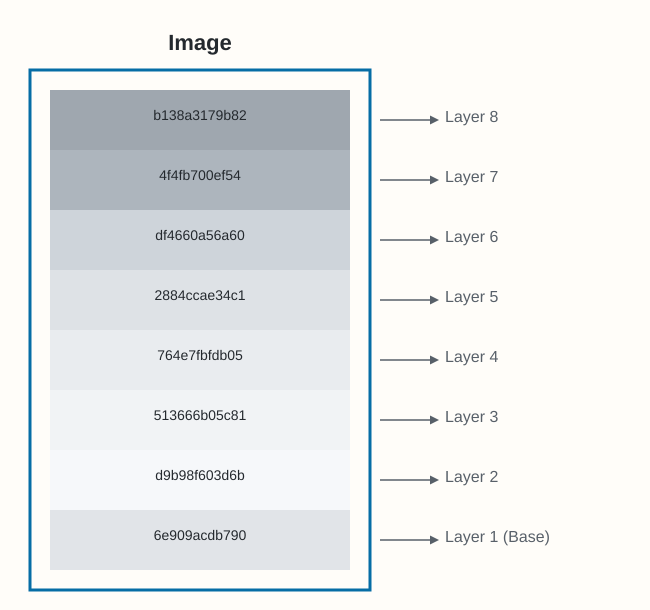
Docker image stacked layers with IDs -
Using docker inspect:
This provides detailed JSON output, including the layer hashes (content digests).
$ docker inspect redis
shell@ [
shell@     {
shell@         "Id": "sha256:ad4b31aa2de6e8f023fb8afa4071c412d89621c1cac957b66d8086c990a9552c",
shell@         "RepoTags": [
shell@             "redis:latest"
shell@         ...,
shell@         "RootFS": {
shell@             "Type": "layers",
shell@             "Layers": [
shell@                 "sha256:1287fbecdfcce6ee8cf2436e5b9e9d86a4648db2d91080377d499737f1b307f3",
shell@                 "sha256:40e3f2f07f478b0ce928b68165b4de343d32f2917d574cebcbdcc323c0f71aa3",
shell@                 "sha256:2afafa4063fa83a4580946419bcb17fd7c1109691b9818c75a0893d9dbbbe2f2",
shell@                 "sha256:ebd572a1ed1d71fdf8543815539bf103aad3193a594a85d64f8a33eb17975845",
shell@                 "sha256:2f0051eaf9cdda36dbc23ac85e719c50a8185143bcd9bf5092f1dad6eb5d3772",
shell@                 "sha256:d024a202e6333b89c1ab1a87bbba1907156a5c43ebd7799135d6ef562b119106",
shell@                 "sha256:5f70bf18a086007016e948b04aed3b82103a36bea41755b6cddfaf10ace3c6ef",
shell@                 "sha256:0123f118c552539d85add2b1886ef45a217fae4c62a243aa92d8e0c91270173e"
shell@             ]
shell@         },
shell@         "Metadata": {
shell@             "LastTagTime": "0001-01-01T00:00:00Z"
shell@         }
shell@     }
shell@ ] -
Using docker history:
This shows the history of commands used to build the image, roughly corresponding to layers. Note that some commands (
ENV,EXPOSE,CMD, etc.) add metadata but don't create filesystem layers, so history doesn't map 1:1 to the inspect layers output.$ docker history redis:latest
shell@ IMAGE CREATED CREATED BY SIZE COMMENT
shell@ ad4b31aa2de6 5 days ago CMD ["redis-server"] 0B buildkit.dockerfile.v0
shell@ <missing> 5 days ago EXPOSE 6379 0B buildkit.dockerfile.v0
shell@ <missing> 5 days ago STOPSIGNAL SIGTERM 0B buildkit.dockerfile.v0
shell@ ... (other build steps) ...
Base Layers and Layer Stacking
Most Docker images begin with a base image, such as ubuntu:22.04, alpine:latest, or the minimal scratch image. Each instruction in the image build process (like running a command or copying files) typically adds a new layer on top of the previous ones.
Think of an image as the complete stack of these layers. Docker uses storage drivers (commonly overlay2) to manage these layers and present them as a single, unified filesystem to the container.
An important concept is how layers interact. If a file exists in a lower layer, and a higher layer adds a file with the same name and path, the file in the higher layer hides or obscures the one below it in the unified view. This is how you "update" files in an image – by adding a new layer with the changed file. Deleting files also involves adding information to a higher layer indicating the file is removed (often called a "whiteout" file).
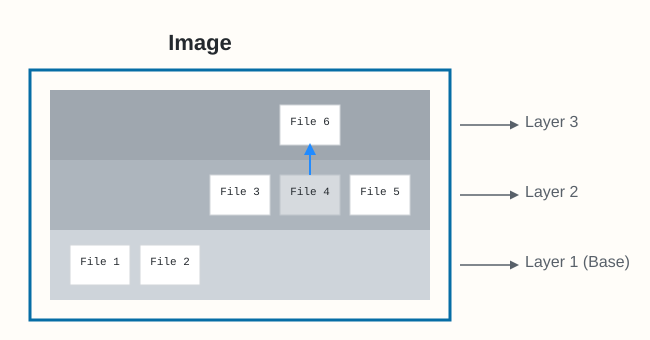
The image itself is essentially metadata (often a manifest file) that identifies the required layers and the order in which to stack them. The actual file content resides within the independent layer objects.
Sharing Image Layers
Docker layers are content-addressable and immutable. This allows for significant efficiencies:
-
Local Sharing: If multiple images on your machine use the exact same layer (identified by its content hash), Docker stores only one copy of that layer locally. When pulling an image, if a layer is already present locally, Docker reuses it, saving download time and disk space. You'll often see
"Already exists"during adocker pull.$ docker pull nginx:latest
shell@ latest: Pulling from library/nginx
shell@ 6e909acdb790: Already exists <---- Layer shared/reused locally
shell@ 5eaa34f5b9c2: Pull complete
shell@ 417c4bccf534: Pull complete
shell@ ... (other layers)
shell@ Digest: sha256:124b44bfc9ccd1f3cedf4...
shell@ Status: Downloaded newer image for nginx:latest
shell@ docker.io/library/nginx:latest -
Registry Sharing: Image registries also store layers uniquely. Pushing multiple images that share base layers or common components is efficient, as the shared layers are only uploaded and stored once.
Pulling Images by Digest (Content Hash)
While using tags (like ubuntu:latest or redis:7.0) is convenient, tags are mutable. This means the image referenced by myapp:1.0 today might be different from the one referenced by the same tag tomorrow if someone pushes an updated image with the same tag. This can cause consistency issues, especially in production or CI/CD pipelines.
For guaranteed immutability, use the image digest. The digest is a cryptographic hash (usually SHA256) of the image's manifest content, which uniquely identifies a specific image version.
Finding Digests:
-
After pulling (using tags):
$ docker images --digests ubuntu
shell@ REPOSITORY   TAG       DIGEST                    IMAGE ID       CREATED        SIZE
shell@ ubuntu latest sha256:72297848456d5... a04dc4851cbc 2 months ago 78.1MB -
Before pulling (inspecting remote image):
$ docker buildx imagetools inspect ubuntu:latest
shell@ Name:      docker.io/library/ubuntu:latest
shell@ MediaType: application/vnd.oci.image.index.v1+json
shell@ Digest:    sha256:72297848456d5d37d1262630108ab308d3e9ec7ed1c3286a32fe09856619a782
shell@ ... (manifest list details)
Pulling by Digest:
Use the format <repository>@<digest-algorithm>:<digest-hash>.
# Pulling the specific ubuntu:latest version identified by its digest
$ docker pull ubuntu@sha256:72297848456d5d37d1262630108ab308d3e9ec7ed1c3286a32fe09856619a782

# Pulling ...
shell@ Digest: sha256:72297848456d5d37d1262630108ab308d3e9ec7ed1c3286a32fe09856619a782
shell@ Status: Downloaded newer image for ubuntu@sha256:72297848456d5d37d1262630108ab308d3e9ec7ed1c3286a32fe09856619a782
Pulling by digest ensures you always get the exact same image version, regardless of tag changes.
Understanding Image and Layer Hashes
It's important to distinguish between:
- Image Digest: A cryptographic hash of the image's manifest file. The manifest lists the image's layers, configuration, and metadata. Changes to the manifest (e.g., adding a layer, changing metadata) result in a new image digest.
- Layer Digest (or DiffID): A cryptographic hash of a specific layer's content (the actual files and directories). Each layer is identified uniquely by its content hash.
This content-addressable storage model guarantees that if the content changes, the digest changes.
Content Hashes vs. Distribution Hashes
When images are pushed to or pulled from a registry, layers are often compressed (e.g., using gzip) to save bandwidth and storage space. This compression changes the layer's bytes, and therefore its hash. To verify integrity during transfer while accounting for compression, layers effectively have two hashes:
- Content Digest (DiffID): Hash of the uncompressed layer content. Used for local identification and caching.
- Distribution Digest: Hash of the compressed layer content. Used by the registry and client during push/pull operations to verify the integrity of the transferred (compressed) data. You might see different hash values in various Docker command outputs or registry APIs depending on whether the content digest or distribution digest is being shown.
Multi-Architecture Images
Docker supports running containers on various hardware architectures (e.g., amd64/x86_64, arm64/aarch64, ppc64le, s390x) and operating systems (Linux, Windows). To simplify working across these platforms, Docker uses multi-architecture images.
Instead of needing separate tags like myapp:1.0-amd64 and myapp:1.0-arm64, a single tag (e.g., myapp:1.0) can point to multiple architecture-specific versions. This is achieved using:
- Manifest List (or OCI Image Index): A top-level manifest that lists pointers to the manifests of images available for different platforms (OS/architecture combinations) under that tag.
- Image Manifest: The manifest for a specific platform, listing the layers and configuration for that particular OS/architecture.
When you docker pull myapp:1.0, the Docker client requests the manifest list, identifies the entry matching the client's platform, retrieves the corresponding image manifest, and pulls the layers specified within it.
Inspecting Multi-Arch Support
$ docker buildx imagetools inspect ubuntu
shell@ Name:      docker.io/library/ubuntu:latest
shell@ MediaType: application/vnd.oci.image.index.v1+json
shell@ Digest:    sha256:72297848456d5d37d1262630108ab308d3e9ec7ed1c3...
shell@
shell@ Manifests:
shell@   Name:        docker.io/library/ubuntu:latest@sha256:3afff29d...
shell@   MediaType:   application/vnd.oci.image.manifest.v1+json
shell@   Platform:    linux/amd64
shell@   Annotations: ...
shell@
shell@   Name:        docker.io/library/ubuntu:latest@sha256:f2e7a1cf...
shell@   MediaType:   application/vnd.oci.image.manifest.v1+json
shell@   Platform:    linux/arm/v7
shell@   Annotations: ...
shell@
shell@   ... (other platforms like arm64/v8, riscv64, ppc64le, s390x)
Using docker manifest inspect on a multi-arch image will show the different architectures and OS versions available:
$ docker manifest inspect golang:latest | grep -E 'architecture|os'
shell@ "architecture": "amd64",
shell@ "os": "linux",
shell@ "architecture": "arm64",
shell@ "os": "linux",
shell@ "architecture": "amd64",
shell@ "os": "windows",
shell@ ... (other supported platforms)
This allows commands like docker run --rm golang:latest go version to work seamlessly, pulling and running the correct version whether you're on an amd64 Linux machine or an arm64 Mac.
Building Multi-Arch Images
The docker buildx command enables building images for multiple architectures from a single machine, often using:
- Emulation (QEMU): Runs builds for foreign architectures inside an emulator. Simpler setup but can be slow.
- Cross-compilation: Requires build tools that can target different architectures directly.
- Native Nodes (Build Cloud/Farm): Uses multiple physical or virtual machines of different architectures coordinated by buildx. Fastest and most reliable method.